#ESP32 Arduino Core
Explore tagged Tumblr posts
Visit Tumblr Blog
Explore Tumblr blogs with no restrictions, modern design and the best experience.
Last Seen Tumblr Blogs


Fun Fact
Tumblr has a low social media market share in South America.
Text
youtube
ESP32-S2/S3 Arduino example source code for USB HID Vendor Feature Report data exchange USB Host - USB Client via web-browser interface. Live demo: https://webhidvendor.blogspot.com/ WebHID API Demo Example ESP32 Arduino Core USB HID Vendor Feature Report Set/Get
#tutorials#how to#programming#arduino#esp32-s2#ESP32 Arduino Core#USB HID Vendor#WebHID API#Vendor Feature Report#USB Host#USB Client#Youtube
0 notes
Text
CrowPanel Advance 7“ HMI von Elecrow – großes Display, großer Funktionsumfang

Mit dem CrowPanel Advance 7“ hat Elecrow ein spannendes All-in-One-Display im Sortiment, das nicht nur durch seine Größe auffällt. Das Touch-Display bringt alles mit, was man für moderne IoT- oder UI-Projekte braucht: Ein hochauflösendes IPS-Panel, einen leistungsstarken ESP32-S3 mit KI-Funktionen und zahlreiche Schnittstellen. Ich habe mir das Panel in den letzten Tagen genauer angeschaut – hier kommt mein erster Eindruck. https://youtu.be/mYx4jaoDOHQ Hinweis: Das hier vorgestellte Produkt – das CrowPanel Advance 7“ HMI – wurde mir von Elecrow kostenfrei für ein Review zur Verfügung gestellt. Der Beitrag spiegelt ausschließlich meine persönliche Meinung wider. Es gab keinerlei Vorgaben oder Einflussnahme auf Inhalt oder Bewertung.


Technische Daten – kompakt zusammengefasst
Hier die wichtigsten Eckdaten auf einen Blick: - Displaygröße: 7 Zoll IPS, 800x480 Pixel - Touch: Kapazitiver Touchscreen - Controller: ESP32-S3, Dual-Core, 240 MHz, mit KI-Unterstützung - Speicher: 16 MB Flash + 8 MB PSRAM - Schnittstellen: USB-C, GPIOs, microSD, Audio, Kamera-Port - Betriebssysteme/Sprachen: Unterstützt Arduino, LVGL, MicroPython und Meshtastic - Stromversorgung: 5 V via USB-C Diese Kombination macht das Panel zu einer interessanten Lösung für viele Anwendungen – ob als HMI (Human Machine Interface), Info-Terminal, DIY-Steuerung oder sogar als kleines Smart-Home-Display.
Ausgepackt und begutachtet
Das Panel kam gut verpackt bei mir an. Im Lieferumfang enthalten war neben dem Display auch ein passendes USB-C-Kabel sowie eine kleine Stiftleiste für GPIO-Anschlüsse. Das Gehäuse wirkt solide, die Rückseite ist sauber verarbeitet und bietet mehrere Befestigungspunkte, z. B. für den Einbau in ein Gehäuse oder Frontpanel. Was mir besonders gefallen hat: Trotz seiner Größe ist das Gerät erstaunlich leicht und flach. Das macht es deutlich einfacher, das Panel in eigene Projekte zu integrieren – z. B. in eine Steuerbox oder ein Dashboard.
Display & Touch – ein echter Hingucker
Das 7-Zoll-IPS-Display überzeugt direkt beim ersten Einschalten: Die Farben sind kräftig, die Blickwinkelstabilität ist hervorragend und die Auflösung ist für diese Größe völlig ausreichend. Auch der Touchscreen reagiert präzise und flüssig – so, wie man es von einem kapazitiven Panel erwartet. Es fühlt sich an wie ein kleiner Tablet-Bildschirm, allerdings offen für deine eigenen Ideen und Projekte.
Viel Power unter der Haube: ESP32-S3
Das Herzstück des Panels ist ein ESP32-S3 – ein leistungsfähiger Mikrocontroller mit zwei Kernen, 240 MHz Taktfrequenz und integrierten Funktionen rund um künstliche Intelligenz (KI). In Kombination mit dem großzügigen Speicher (16 MB Flash, 8 MB PSRAM) eignet sich das Gerät nicht nur für einfache UI-Anwendungen, sondern auch für Projekte mit Machine Learning oder Bildverarbeitung – zum Beispiel in Verbindung mit einer angeschlossenen Kamera.
Schnittstellen & Möglichkeiten
Ein Blick auf die Anschlussmöglichkeiten zeigt: Das Panel will mehr sein als nur ein Display. Neben USB-C (für Daten und Strom) sind auch ein microSD-Karten-Slot, ein Audio-Ausgang, ein Kamera-Port und eine GPIO-Stiftleiste vorhanden. Damit lässt sich das CrowPanel leicht erweitern und in größere Projekte einbinden – sei es zur Datenspeicherung, als Audioplayer oder zur Anbindung an Sensoren und Aktoren. Read the full article
2 notes
·
View notes
Text
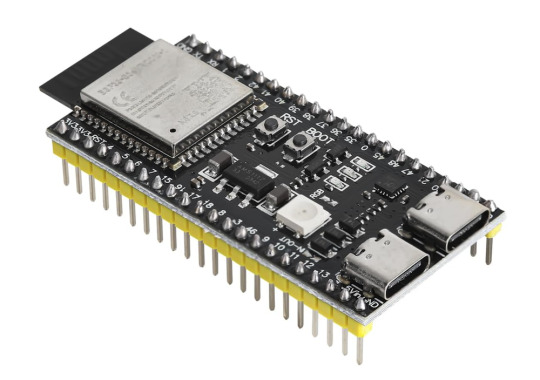
ESP32-S3 Dev Board – Technical Overview
ESP32-S3 DevKitC-1 is a compact, dual-core development board with Wi-Fi and Bluetooth LE, ideal for prototyping IoT, USB, and low-power embedded applications using the Arduino IDE.
0 notes
Text
Getting Started with Embedded Systems Programming
Embedded systems programming is the backbone of modern electronics. From smartwatches to washing machines, embedded systems power the intelligent functions of countless everyday devices. This guide will introduce you to the basics of embedded programming, key tools, and how to begin building your own embedded applications.
What is an Embedded System?
An embedded system is a computer integrated into a larger system or device, performing dedicated functions. Unlike general-purpose computers, embedded systems are designed for specific tasks, often with constraints on power, memory, and processing.
Examples of Embedded Systems:
Microcontrollers in home appliances
Sensor-based devices (e.g., temperature sensors, motion detectors)
Medical equipment
Automotive control systems
IoT (Internet of Things) gadgets
Core Components of an Embedded System
Microcontroller or Microprocessor: The brain of the embedded system (e.g., Arduino, STM32, ESP32).
Memory: RAM and ROM to store instructions and data.
Input/Output Interfaces: Connects to sensors, displays, motors, and communication modules.
Software: Custom firmware developed for specific functions, typically in C or C++.
Popular Programming Languages
C: Most widely used due to its efficiency and low-level hardware access.
C++: Used when object-oriented design is required.
Assembly: For highly optimized or time-critical routines.
MicroPython: Python for microcontrollers (e.g., ESP8266, Micro:bit).
Getting Started with Embedded Programming
Select Your Platform:
Beginners: Arduino (easy setup, wide community support)
Advanced: STM32, Raspberry Pi Pico, ESP32
Set Up Your Development Environment:
Install IDEs like Arduino IDE, PlatformIO, STM32CubeIDE
Download necessary drivers and board support packages
Write and Upload Code: Create simple programs like blinking an LED, then expand to sensors, displays, and communication modules.
Example: Blink an LED with Arduino
void setup() { pinMode(13, OUTPUT); // Set pin 13 as output } void loop() { digitalWrite(13, HIGH); // Turn LED on delay(1000); // Wait for 1 second digitalWrite(13, LOW); // Turn LED off delay(1000); // Wait for 1 second }
Tools and Debugging
Serial Monitor: For real-time debugging and logging.
Oscilloscope & Logic Analyzer: For electrical signal inspection.
In-Circuit Debuggers: Like JTAG or ST-Link for low-level debugging.
Best Practices
Write modular and readable code.
Use debouncing for physical inputs like buttons.
Handle memory carefully to avoid overflows.
Optimize power usage in battery-powered devices.
Conclusion
Embedded systems programming is both fun and powerful, offering endless possibilities for innovation in hardware and software. Whether you’re building a home automation project or diving into the world of IoT, understanding the basics of embedded programming gives you the foundation to create smart, responsive devices.
0 notes
Text
The future of smart home control begins with one sleek, powerful interface — the Nextion NX8048P050-011R 5.0” Intelligent Resistive HMI Touchscreen. Ideal for automation projects, this display offers unmatched user experience, intelligent processing, and seamless integration. If you're planning to level up your smart home or automation setup in 2025, this intelligent touchscreen should be on your radar.
Available now at www.sonoff.in, this module is a must-have for developers, hobbyists, and smart home enthusiasts.
Power-Packed 5.0” Intelligent Display for Smart Control
The Nextion NX8048P050-011R boasts a 5.0-inch resistive touchscreen, offering sharp visuals and precise touch response. Designed without an enclosure, this screen gives flexibility in mounting it into custom panels, enclosures, or control stations.
The resistive touch feature supports usage even when wearing gloves — making it practical for industrial, automation, and DIY applications. It’s a display that adapts to your environment, not the other way around.
Advanced HMI Capabilities Built for Efficiency
This is more than just a screen. It's a powerful HMI (Human Machine Interface) equipped with:
Onboard microcontroller for fast UI rendering
Rich GUI design with Nextion Editor
Easy drag-and-drop interface development
Support for static images, buttons, sliders, and dynamic text
Integrated flash memory for storing UI pages
You can build multi-layered smart interfaces without relying on external MCUs for rendering. Control everything from HVAC to lighting systems — with just a touch.
Streamlined Communication with Embedded Systems
The Nextion NX8048P050-011R communicates using UART serial communication, making it compatible with Arduino, Raspberry Pi, ESP32, and more. Developers love how it simplifies hardware-software interaction.
Commands are sent via a simple serial interface, which dramatically reduces processing load on your main MCU. This allows developers to allocate power where it truly matters.
Why It’s Perfect for Home and Industrial Automation
Here’s why the Nextion NX8048P050-011R is a game changer:
Compact but powerful – Fits in tight spaces while delivering advanced UI functionality.
Customizable UI – Create polished, user-friendly interfaces tailored to your smart home design.
Responsive Touch – Reliable performance in both residential and industrial settings.
Highly Compatible – Works seamlessly with Sonoff smart switches and automation modules from www.sonoff.in.
Whether you’re managing lighting, thermostats, or entire smart systems, this touchscreen gives you intuitive and elegant control.
Nextion Editor – No Code? No Problem.
The Nextion Editor software is a dream for non-programmers. You don’t need advanced coding skills to build dynamic user interfaces. Just drag and drop components onto your screen canvas.
From progress bars to image sliders, your interface can be as simple or complex as your imagination allows. With built-in event triggers, automation becomes a breeze.
Technical Specs at a Glance
Let’s dive into the core specs that make this touchscreen a powerhouse:
Display Size: 5.0” resistive touch panel
Resolution: 800x480 pixels
Flash Memory: 16MB
RAM: 3584 bytes
EEPROM: 1024 bytes
MCU: 48MHz
Serial Port: TTL UART
Operating Voltage: 5V
These specifications ensure smooth performance, fast response, and consistent reliability in demanding automation environments.
Installation and Custom Integration
Thanks to its open-frame design, you can install the NX8048P050-011R in custom enclosures or panels. Whether it’s a wall-mounted control panel or embedded into a furniture piece, the flexibility is unbeatable.
Pair it with Sonoff Wi-Fi switches or smart relays to create a smart home interface that looks and feels professional.
Smart Solutions, Smarter Shopping with www.sonoff.in
Looking for a reliable supplier in India? www.sonoff.in is the trusted destination for Nextion displays, Sonoff smart devices, and complete home automation solutions.
They offer fast delivery, excellent customer service, and authentic products backed by warranty. Get access to India’s top smart home gadgets — all in one place.
Conclusion: Smart Control Starts Here
The Nextion NX8048P050-011R 5.0” intelligent touchscreen is the perfect HMI solution for next-gen smart home setups. Its seamless performance, rich feature set, and compatibility with Sonoff devices from www.sonoff.in make it a standout choice.
Don't settle for clunky switches and outdated interfaces. Take control of your environment — the smart way.
Explore the future of home automation at www.sonoff.in and power up your smart living journey today.
#sonoff#smarthome#smartappliances#googlehomeintegration#alexacompatible#sonoffpowr3#homeautomation#sonoffindia#wifismartswitch
0 notes
Text
UHF Reader Based on Pico W & ESP32 with 50 Tags/Second Reading within 1.5 Meter Range

A UHF Reader (Ultra High Frequency Reader) is a device that is used to read and write data from UHF RFID tags within the 860MHz-960MHz frequency range. It is a multi tags 50 tags/second reading/writing device within 1-1.5 meter range designed with cutting edge UHF technology. It is a compact, portable and easy to use device.
The UHF reader has 2 variants: one is UHF Reader by Pico W and another is UHF Reader by ESP32. The Pico W variant comes with RP2040 microcontroller with Wi-Fi and BLE support. It is compatible with MicroPython, CircuitPython and Arduino for programming. ESP32 variant comes with ESP32 S3 series microcontroller and has 2.4GHz & Bluetooth 5 (LE) support. It is compatible with Arduino and Espressif IDE for programming.
Key Features and Specifications:
UHF Reader Pico Variant:

Powered by Raspberry Pi Pico W
RP2040 microcontroller dual-core Arm Cortex M0+ microprocessor with 264kB RAM
Supports Wi-Fi and BLE
1.14” TFT display for better visualization
Multi-tone buzzer for audio alerts
Micro USB Support for programming & Type C support for power
3 programmable buttons and Reset button
SD card slot for data storage/transfer
LED Status for power and battery charging
Multipurpose GPIOs breakout for interfacing external peripherals
SWD pins breakout for serial debugging
Supports MicroPython, CircuitPython, and Arduino for programming
UHF Reader ESP32 Variant:

Powered by ESP32 S3 WROOM-1
Dual-core 32 bit LX7 microprocessor with Up to 8 MB PSRAM and up to 16 MB flash memory
Supports 2.4GHz (802.11b/g/n) Wi-Fi and Bluetooth 5 (LE)
1.14” TFT display with ST7789 display driver
Comes with a Read and Write UHF module.
Frequency range of 865.1MHz-867.9MHz (for EU/UK) and 902.25MHz-927.75MHz (for US)
Can Identify 50 tags/second up to the 1.5-meter range.
TTL UART communication interface and communication baud rates 115200bps-38400bps
output power 18-26dBm and output power accuracy +/- 1dB
operation current 180mA at 3.5V (26 dBm Output), 110mA at 3.5V (18 dBm Output)
Multi-tone buzzer for audio alerts
2 user programmable buttons, Boot and Reset buttons
For power and programming support, the Type C Interface
SD Card slot for data transfer/storage
LED status for power and charging
Multipurpose GPIOs breakout for interfacing external peripherals
Supports Arduino and Espressif IDE for programming
By using ESP32 and RP2040, you can build a UHF RFID reader for scan tags and data tracking. This UHF Reader with ESP32 and Pico by SB Components is suitable for applications like warehouses, retail stores, and many other applications where you want to track your inventory data accurately.
#technology#innovation#tech#iot#rfid#uhf#uhf reader#arduino#espressif#iot applications#raspberry pi#rp2040#esp32#projects#programming#ultra high frequency reader#rfid tags#data tracking#electronics
1 note
·
View note
Text
Getting Started with Embedded Programming: Tools and Techniques
Embedded programming is an exciting field that combines hardware and software to create systems that control various devices and processes. From simple microcontrollers in household appliances to complex systems in automobiles and medical devices, embedded programming plays a vital role in modern technology. If you’re looking to dive into embedded programming, this guide will outline essential tools and techniques to help you get started.

Understanding Embedded Programming
At its core, embedded programming involves writing software that runs on embedded systems—computers designed to perform dedicated functions within larger systems. Unlike traditional programming, which often runs on general-purpose computers, embedded programming requires a deep understanding of hardware constraints, real-time performance requirements, and low-level programming.
Essential Tools for Embedded Programming
Microcontrollers and Development Boards
Arduino: A popular platform for beginners, Arduino boards come with an integrated development environment (IDE) and a user-friendly programming language based on C/C++. The vast community support and numerous libraries make it easy to get started.
Raspberry Pi: Although primarily a single-board computer, Raspberry Pi can be used for embedded programming projects, especially those requiring more computational power. It supports various programming languages and operating systems.
ESP8266/ESP32: These Wi-Fi-enabled microcontrollers are ideal for IoT projects. They are programmable using the Arduino IDE or the Espressif IDF and offer great features for wireless applications.
Development Environments and IDEs
Arduino IDE: Specifically designed for Arduino programming, this IDE simplifies the process of writing and uploading code to the board.
PlatformIO: An open-source ecosystem for IoT development, PlatformIO supports multiple boards and frameworks, providing advanced features like libraries and debugging tools.
Keil uVision: A popular IDE for ARM microcontrollers, offering a comprehensive development environment, including simulation and debugging capabilities.
Eclipse with Embedded Plugins: Eclipse can be customized with plugins for embedded development, supporting various toolchains and microcontrollers.
Compilers and Toolchains
GCC (GNU Compiler Collection): Widely used for compiling C and C++ code for embedded systems. It supports various microcontroller architectures and is essential for low-level programming.
ARM Toolchain: A collection of tools used to develop applications for ARM-based microcontrollers. It includes a compiler, assembler, and linker, providing everything needed for embedded development.
Debugging Tools
JTAG/SWD Debuggers: Hardware debuggers like J-Link or ST-Link provide a means to debug embedded systems at the hardware level, allowing for real-time code execution and monitoring.
Serial Monitors: Tools that enable communication between your computer and the microcontroller via serial ports. They are useful for debugging and monitoring output during development.
Techniques for Embedded Programming
Start with a Simple Project Begin with a basic project that interests you, such as blinking an LED or reading a sensor. This hands-on experience will help you understand the fundamentals of embedded programming and familiarize you with the tools.
Learn C/C++ Basics Most embedded systems are programmed in C or C++, so having a strong grasp of these languages is essential. Focus on key concepts such as data types, control structures, and pointers, as these are frequently used in embedded programming.
Understand Hardware Basics Familiarize yourself with the hardware you are working with, including pin configurations, voltage levels, and peripheral interfaces (like I2C, SPI, UART). Knowing how to interact with the hardware is crucial for successful embedded programming.
Utilize Libraries and Frameworks Take advantage of existing libraries and frameworks to simplify your development process. Libraries can provide pre-written code for common functions, such as controlling motors or reading sensors, allowing you to focus on the logic of your application.
Implement Real-Time Operating Systems (RTOS) For more complex projects, consider using an RTOS to manage multitasking and timing constraints. An RTOS helps in scheduling tasks, ensuring that your application meets real-time requirements.
Practice Debugging and Testing Develop good debugging habits by regularly testing your code and using debugging tools. Learn to analyze errors, use breakpoints, and monitor variables during execution. Rigorous testing will ensure that your embedded application functions as intended.
Expanding Your Knowledge
Online Courses and Tutorials: Platforms like Coursera, Udacity, and edX offer various courses in embedded systems and programming. These courses can provide structured learning and hands-on projects.
Books and Resources: Consider reading books like "Programming Embedded Systems in C and C++" by Michael Barr or "The Definitive Guide to ARM Cortex-M3 and Cortex-M4 Processors" by Joseph Yiu for deeper insights.
Join Communities and Forums: Engaging with online communities such as Arduino forums, Raspberry Pi forums, or Stack Overflow can provide support and inspiration. These platforms are valuable for asking questions and sharing your projects.
Conclusion
Getting started with embedded programming can be both challenging and rewarding. By leveraging the right tools and techniques, you can develop your skills and create innovative projects that bridge the gap between hardware and software. Whether you aim to build IoT devices, control robotics, or develop smart applications, the world of embedded programming offers endless possibilities. So, gather your tools, start coding, and unleash your creativity in this fascinating field!
0 notes
Text
5 Key Differences Between ESP32 PLC and Arduino PLC Systems
To enable programming control that is used to automate and control the behavior of electronic devices and processes, we have the Programmable Logic Controllers (PLCs). There are certain differences between them in terms of capability and application, although ESP32 and arduino boards can be programmed as PLCs.
This article will highlight 5 major differences between ESP32 PLC and Arduino PLC systems pertaining to connectivity, I/O interfaces, processing power, programming complexity, and industrial suitability. Identifying these contrasting features will help you determine which platform better matches your specific project requirements.
1. Processing Power and Speed
Compared to the Arduino PLC, the ESP32 PLC accelerates a great deal of power and pace. The interesting fact about ESP32 is that it has a dual-core processor, capable of working up to 240 MHz, while the basic Arduino processors are single-core and clocked at 16 MHz. The disparity in processing powers implies that the ESP32 can deal with progressively complex undertakings, gather and process information quicker, and bolster more gadgets at a go. It is perfect for use in systems that need on-the-go data operation like advanced substantially automation connections arrangements or industrial monitoring structures.
2. Connectivity Options
Regarding connectivity, the ESP32 undeniably stands out due to the integrated WiFi PLC and Bluetooth PLC modules. This makes it simple to implement within IoT (Internet of Things) projects and can be controlled from a distance, with data acquisition not requiring any additional modules.
Conversely to, Arduino PLC systems can be enabled with WiFi and Bluetooth functionality however, this often comes in the form of additional shields or modules that need to be introduced. This complicates not only your projects but also your setup's total cost and footprint.
3. Power Consumption
Another important aspect is that of power consumption. The main selling point of the ESP32 PLC is the built-in power-saving mechanisms, as it features a variety of sleep stages and power domains that enable the microcontroller’s built-in power management system to put the SoC into the REST sleep mode when the processor is not undertaking demanding operations. This makes it perfect for applications that normally use power from batteries or portable applications. On the other hand, Arduino PLC systems are not known for power consumption, but neither do they come with the exciting power management features of ESP32 that might result in limited battery life in cases where power conservation is important.
4. Industrial Suitability
Rugged form factors like DIN rail mounts along with screw terminal connections, make industrial-grade Arduino PLCs suitable for harsh plant environments. ESP32 lacks the protective casings and screw-type terminals commonly demanded in industrial settings.
5. I/O Interfaces
The available input/output pins are generally higher on standard Arduino boards than ESP32 dev boards. Expanding I/O ports on ESP32 requires additional multiplexer circuits. However, industrial ESP32 PLCs come integrated with sizeable I/O terminals comparable to that of Arduino PLCs.
Conclusion
To summarize, while Wi-Fi/BT connectivity, processing performance and I/O expandability favors ESP32 PLC, ease of programming and out-of-the-box industrial compatibility gives Arduino PLC an edge. Get the best of both worlds with hybrid ESP32-Arduino PLC solutions! Visit https://erqos.com/ for all your PLC and automation parts.
0 notes
Text
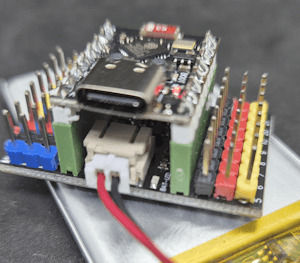
This should work, if so I don't need to write much code

ID: A TTGO Lora32 board with a micro sd in it
Not a great picture but as I gathered from the datasheet there is in fact a micro sd slot on the Lora32 boards, going to work on some code for reading/writing it and hopefully that'll make all sorts of PierMesh functionality available without a secondary computer meaning lower costs for users/operators
21 notes
·
View notes
Text
youtube
Easiest simple way to change ESP32-S2/S3 USB HID Vendor ID (VID), Product ID (PID), Manufacturer Name, Product Name & Serial Number w/ Espressif ESP32 Arduino Core. How to Change USB VID & PID on Single USB HID Class Device - ESP32 Arduino Core Library
#how to#programming#arduino#esp32-s2#Manufacturer Name#USB HID Vendor ID#ESP32 Arduino Core#Product Name#Serial Number#Product ID#Youtube
0 notes
Text
Warum der Arduino trotz ESP32 & Co. nicht ausgedient hat

„Arduino? Das nutzt doch heute keiner mehr…“ Wer sich in den letzten Jahren mit Mikrocontrollern beschäftigt hat, stolpert überall über den ESP32. Dual-Core, WLAN, Bluetooth, 240 MHz, massig Speicher – und das alles für ein paar Euro. Kein Wunder also, dass der gute alte Arduino UNO im Schatten der neuen Mikrocontroller-Generation zu stehen scheint. Die Kommentare in Foren und Social Media klingen dann auch oft so: „Warum noch einen Arduino benutzen, wenn es doch den ESP32 gibt?“ Aber ist das wirklich so? Hat der Arduino tatsächlich ausgedient? Oder gibt es gute Gründe, auch heute noch auf den betagten Klassiker zu setzen? Und vor allem: Wenn ich gerade erst einsteige – sollte ich dann überhaupt noch mit einem Arduino anfangen, oder direkt auf einen ESP32 setzen? Genau um diese Fragen geht es in diesem Beitrag. Und so viel sei schon mal verraten: Leistung ist nicht immer alles.
ESP32 – das moderne Powerpaket (aber nicht für alles nötig)
Wenn man sich heute in der Maker-Szene oder auf YouTube umschaut, könnte man fast glauben, es gäbe nur noch den ESP32. Und das ist auch gar nicht so abwegig: Der ESP32 bringt schon ab Werk eine ganze Menge beeindruckender Features mit, die früher nur mit viel zusätzlicher Hardware möglich waren. 🔥 Ein kurzer Blick auf die Highlights: - Dual-Core mit bis zu 240 MHz - WLAN und Bluetooth direkt integriert - Bis zu 520 kB RAM und mehrere Megabyte Flash - Viele GPIOs, PWM, ADC, DAC, I2C, SPI, CAN, Touch-Sensoren, … - Bereits ab ca. 3 € (je nach Ausführung und Händler)
ESP32-S3-Matrix
ESP32-C3 mit LiPo Batterie
zwei Elecrow CrowPanels 2,4" & 5.0"
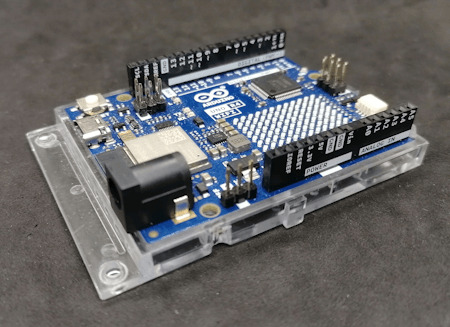
Arduino Nano ESP32
Generic-ESP32 Mikrocontroller

ESP32-C3 Super Mini

ESP32-S3-Zero Und dann wäre da noch ein echter Publikumsliebling: die ESP32-CAM.

Vergleich ESP32-CAM und ESP32-S3 CAM

ESP32-CAM mit externer Antenne und Board

ESP32-CAM

ESP32-CAM Modelle Für rund 5 € bekommt man hier nicht nur die Rechenpower des ESP32, sondern auch gleich eine kleine Kamera mit bis zu 5 Megapixeln dazu. Damit sind Projekte wie: - Überwachungskamera, - QR-Code-Scanner, - Fotos per E-Mail oder Telegram senden ganz einfach umsetzbar – ohne zusätzliche Hardware. Der Raspberry Pi Pico (RP2040) mischt kräftig mit – und bekommt Verstärkung Doch der ESP32 ist nicht allein auf dem Platz. Der Raspberry Pi Pico mit seinem RP2040 Dual-Core Cortex-M0+ Prozessor (133 MHz) hat sich schnell als leistungsfähige und günstige Alternative etabliert – und das in mehreren Varianten: BoardWLANBluetoothBesonderheitenRaspberry Pi Pico❌❌Basisversion, ohne FunkRaspberry Pi Pico W✅✅ (per Firmware)WLAN onboard, BT aktivierbarRP2350-Boards❌❌Mehr Power, keine Funkmodule (derzeit)


RP2040:bit
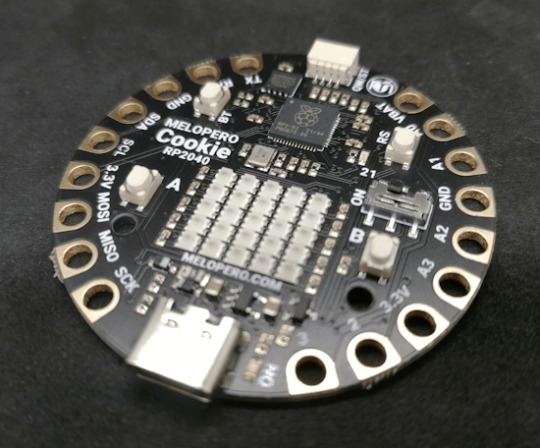
Melopero Cookie RP2040
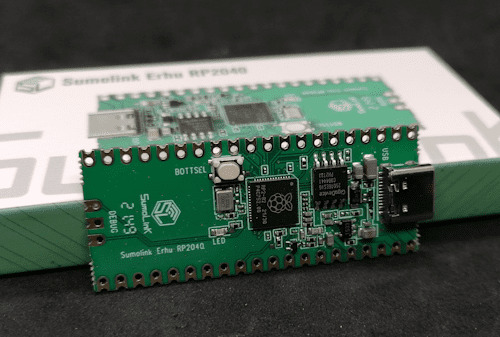
Sumolink Erhu RP240

Mikrocontroller - XIAO RP2040 & Raspberry PI Pico

Raspberry Pi Pico 2 - RP2350A

XIAO RP2350 Mit dem neuen RP2350-Chip steht mittlerweile ein leistungsstärkerer Nachfolger in den Startlöchern. Er wird derzeit auf einigen neuen Boards verbaut (z. B. auf Prototypen oder Dev-Boards asiatischer Hersteller) und bringt: - Höhere Taktraten (bis 200 MHz möglich), - Verbesserte Peripherie, - Und bleibt trotzdem kompatibel zur RP2040-Familie. Was aktuell noch fehlt: WLAN und Bluetooth sind (noch) nicht integriert – was den Chip für reine IoT-Projekte (noch) weniger attraktiv macht, aber für USB-HID oder Highspeed-Sensoranwendungen interessant sein kann.
Arduino – Der Klassiker mit Kultstatus (und vielen Gesichtern)
Wenn man „Arduino“ sagt, denken viele sofort an das gute alte Original: Arduino UNO R3, Made in Italy, stabil, bewährt – aber auch nicht ganz billig. Und genau da beginnt der kleine Konflikt, den vermutlich viele kennen: ➡️ Das originale Board unterstützt die Plattform, die Entwicklung und das Open-Source-Projekt. ➡️ Aber: Der Preis liegt oft bei 20 € und mehr – während Clones für 2–3 € zu haben sind. Doch: Genau das ist eben auch der Spirit von Open Source. Die Arduino-Plattform wurde so entwickelt, dass jeder (mit Einhaltung gewisser Auflagen) eigene Boards bauen und verkaufen darf. Und das tun viele Hersteller – vor allem in Asien. Dabei gibt es längst nicht nur einfache UNO- oder Nano-Kopien. Die Vielfalt an Arduino-kompatiblen Boards ist inzwischen riesig: Board / CloneBesonderheitPreisbereichNano Clone (CH340G)Klassiker für einfache Projekte2–4 €Pro MiniOhne USB, super klein und sparsam2–4 €Nano mit integriertem OLEDAnzeige direkt am Mikrocontroller4–8 €Nano mit 2,4 GHz Funk (nRF24L01) oder 433 MHz ModulIdeal für Funkprojekte ohne WLAN5–10 €Nano mit ESP8266-Modul onboardWLAN-fähig, bleibt aber Arduino-kompatibel5–10 €Nano mit Bluetooth HC-05 oder HM-10Kabellose Kommunikation über BT Classic oder BLE5–10 €

Arduino Nano mit nRF24L01 Erweiterungsboard

Microcontroller BLE-Nano von Keywish

Arduino UNO R3
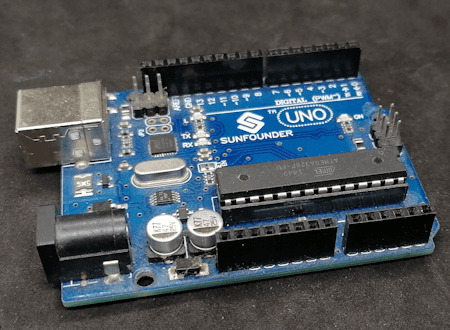
Arduino UNO R3 Clone von der Firma Sunfounder


Arduino Nano V3 , ATmega328P

Arduino Mega 2560 Pro mini

Arduino Nano V3
Seeeduino Nano Gerade diese Vielfalt an spezialisierten Clones und Abwandlungen ist ein echter Vorteil: Man wählt sich für sein Projekt genau die Features, die man braucht – und spart sich den Ballast von Funktionen, die gar nicht benötigt werden. ➡️ Keine WLAN-Probleme, wenn das Projekt gar kein WLAN braucht. ➡️ Keine Bluetooth-Komplexität, wenn ein simples Relais geschaltet werden soll. ➡️ Aber: Wenn ein Display gewünscht ist, einfach ein Clone mit integriertem OLED nehmen. Teures Original oder günstiger Clone? Das Original aus Italien unterstützt natürlich die Entwickler, die die Plattform erst möglich gemacht haben. Gerade wenn es um professionelle Projekte, Support oder Weiterentwicklung geht, ist das ein guter Grund, auch mal bewusst zum Original zu greifen. Wer dagegen einfach ein kleines Hobby-Projekt umsetzt oder ein günstiges Board für Lernzwecke sucht, wird vermutlich bei einem Clone aus Fernost landen – und das ist auch okay so. Beides hat seine Berechtigung. Im nächsten Abschnitt schauen wir uns an, warum diese Einfachheit und Flexibilität dem Arduino einen Platz auf dem Basteltisch gesichert haben – auch wenn ESP32, RP2040 & Co. daneben liegen. Clone statt Frust: Warum gerade Anfänger mit günstigen China-Boards besser fahren Seien wir ehrlich: Wer mit Mikrocontrollern anfängt, wird früher oder später mal einen Fehler machen. Ein Kabel verpolt, einen Pin aus Versehen kurzgeschlossen, eine Lötstelle zu heiß… ➡️ Passiert. Gehört zum Lernen einfach dazu. Wenn dann das teure Original-Board abraucht, ist der Frust groß – und das Projekt vielleicht erst mal gestorben. Anders sieht es aus, wenn das eingesetzte Board nur 2–3 € gekostet hat. Dann bestellt man sich einfach ein neues und weiter geht’s. Genau deshalb finde ich: ➡️ Gerade Anfänger sind mit einem günstigen Clone gut beraten. Das senkt die Hemmschwelle, etwas auszuprobieren, und macht es viel leichter, aus Fehlern zu lernen. Ob Arduino Nano Clone, Pro Mini oder einer der vielen China-Nachbauten mit Zusatzfeatures wie OLED oder Funk – hier kann man für kleines Geld experimentieren, lernen und Spaß haben. Und wenn das Projekt später stabil läuft und vielleicht sogar „ernsthaft“ eingesetzt werden soll, kann man immer noch überlegen, ob man auf ein höherwertiges Original umsteigt.
Wann ESP32, wann Arduino? – Entscheidungshilfe für Projekte
Natürlich ist es immer verlockend, einfach zum leistungsstärksten Mikrocontroller zu greifen. Aber genau das ist oft gar nicht nötig – und manchmal sogar umständlicher. Denn: Der beste Mikrocontroller ist der, der genau das kann, was dein Projekt braucht – nicht mehr und nicht weniger. Um dir die Wahl etwas leichter zu machen, hier eine kleine Entscheidungshilfe: ProjektideeEmpfehlungWarum?Blinkende LEDs, Relais steuern, Taster abfragenArduino UNO, Nano, Pro MiniEinfach, stabil, günstig, kein OverkillLCD/OLED-Anzeige mit Temperatur-/FeuchtesensorArduino oder PicoWLAN meist nicht nötig, einfache UmsetzungDaten per WLAN ins Netz (z. B. ThingSpeak, MQTT)ESP32, Pico WWLAN/BT bereits integriert, viele Beispiele vorhandenMobile Projekte mit Akku und langer LaufzeitPro Mini (mit LowPower-Mod) oder ESP32 mit Deep SleepStromsparend, je nach FunkbedarfKamera-Projekte (Foto/Video-Streaming)ESP32-CAMKamera onboard, einfache EinbindungUSB-Tastatur-Emulation, MacroPads, HID-GeräteArduino Leonardo / Micro oder Raspberry Pi Pico (RP2040)Beide unterstützen native USB-HIDFunkprojekte ohne WLAN (z. B. 433 MHz, nRF24L01)Arduino Nano Clone mit FunkmodulKein unnötiges WLAN, einfache FunkanbindungEchtzeitkritische Anwendungen mit viel GPIO und TimingRP2040 oder RP2350Schnelles Realtime-Processing dank PIO, viele GPIOs 💡 Zusatz-Tipp: Für USB-Tastatur-Emulation (z. B. MacroPads oder automatisierte Eingaben) ist der Arduino Leonardo eine super Wahl, weil er den ATmega32u4 verwendet, der USB nativ unterstützt. Alternativ funktioniert das auch mit dem Arduino Micro oder dem Raspberry Pi Pico (RP2040), dort oft über die TinyUSB-Bibliothek.

Keyestudio Leonardo

Arduino Leonardo Clone

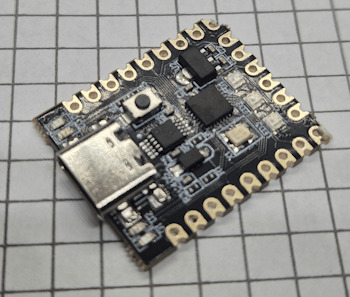
Mini RP2040 Developmentboard
Fazit: Alt, aber alles andere als nutzlos!
Ja, der ESP32 ist ein echtes Powerpaket. Ja, der Raspberry Pi Pico (RP2040) mischt kräftig mit und hat auch seinen Platz auf dem Basteltisch. Und ja – es gibt mittlerweile zig Alternativen mit WLAN, Bluetooth, Kamera, HID und noch viel mehr. Aber: Gerade das macht den guten alten Arduino so sympathisch: Er will gar nicht alles können – sondern einfach das, was man für viele kleine bis mittlere Projekte wirklich braucht. Ein Relais schalten? Ein paar LEDs blinken lassen? Einen Sensor auslesen und auf dem Display anzeigen? ➡️ Warum dafür einen Dual-Core mit WLAN bemühen, wenn es ein Nano für 3 € auch tut? Und genau das ist der Punkt: 🔹 Der Arduino ist einfach. 🔹 Er ist stabil. 🔹 Er hat eine riesige Community und viele erprobte Bibliotheken. 🔹 Er eignet sich perfekt zum Lernen – und bleibt auch danach oft die pragmatische Wahl. Gerade Anfänger profitieren enorm davon, sich nicht direkt mit komplexen Themen wie WiFi-Stack, Sleep-Modes oder USB-Treiberherausforderungen herumschlagen zu müssen. Und: Auch fortgeschrittene Bastler greifen gerne zum „alten Bekannten“, wenn es mal schnell, unkompliziert und robust sein soll. Mein Fazit: Der Arduino hat seinen festen Platz – auch im Jahr 2025. Nicht überall, aber da, wo „Keep it simple“ gefragt ist, ist er oft genau die richtige Wahl. ➡️ ESP32, RP2040 & Co. sind keine Gegner – sie sind Mitspieler im Team der Mikrocontroller. Die Kunst ist es, je nach Projekt den passenden Baustein auszuwählen. Jetzt bist du dran! Arbeitest du noch mit dem Arduino? Oder hast du komplett auf ESP32, RP2040 & Co. umgestellt? Welche Projekte hast du schon umgesetzt – und welcher Mikrocontroller war dafür die beste Wahl? 👉 Schreib es mir gerne in die Kommentare – ich freue mich auf den Austausch! Read the full article
0 notes
Text

ESP32 WROVER Kit, Compatible with Arduino IDE The starter kit is based on the development board from esp32 wrover. It integrates with bluetooth and wireless.A powerful dev board for IOT module project development.ESP32-WROVER series is developed by Espressif Systems, below is key features and applications are summarized: I. ESP32 Wrover Specifications - Chip Architecture - Dual-core SoC (ESP32-D0WD or D0WD-V3) with a clock speed of 80–240 MHz (dynamic frequency scaling)13 - 520 KB integrated SRAM, expandable via external SPI RAM/Flash1 - Built-in 4–16 MB SPI Flash and 8 MB SPI PSRAM (depending on model, e.g., WROVER-B/E)37 - Wireless Connectivity - 2.4 GHz Wi-Fi (802.11 b/g/n) with up to 150 Mbps throughput36 - Dual-mode Bluetooth: Classic (BT) and Low Energy (BLE)36 - Peripherals & Interfaces - SPI, I2C, UART, SDIO, Ethernet interfaces3 - Support for capacitive touch, Hall effect sensors, PWM outputs37 II. ESP32 Wrover Kit Development Environment & Tools - Programming Frameworks - Official ESP-IDF framework (FreeRTOS + LwIP stack), C/C++-based16 - Arduino IDE compatibility via ESP32 board manager28 - Optional Python/C hybrid development using Zerynth Studio5 - Hardware Debugging Tips - Use 5V power for camera modules (3.3V may cause image instability)2 - Adjust SPI pin definitions (e.g., SCK=14, MISO=12) based on hardware layout4 III. ESP32 Devkit Typical Applications - IoT Devices - Sensor networks, smart home controllers with ultra-low-power modes (sleep current Read the full article
0 notes
Text
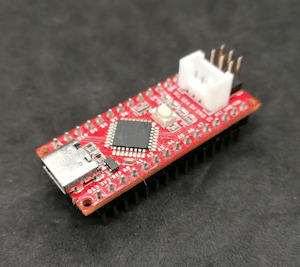
ESP32 Wireless IoT Development Board in Arduino Uno Form Factor
The Wemos R32 ESP32 module is a popular IoT development system due to its dual-core processor, integrated WiFi, Bluetooth, and BLE. Also contributing to its popularity is the ecosystem built by the vast ESP32 community. An ever-growing number of IoT developers prefer programming the ESP32 with the Arduino IDE.
0 notes
Text
Introduction to Internet of Things (IoT) Programming

The Internet of Things (IoT) is revolutionizing the way we interact with devices, allowing everyday objects to connect to the internet and share data. From smart homes and wearables to industrial automation, IoT is reshaping the world. In this post, we'll dive into the basics of IoT programming and how you can start creating your own smart applications.
What is IoT?
IoT refers to a network of physical devices embedded with sensors, software, and other technologies to connect and exchange data with other devices and systems over the internet.
Key Components of IoT Systems
Devices/Sensors: Physical components that collect data (e.g., temperature sensors, motion detectors).
Connectivity: Wi-Fi, Bluetooth, Zigbee, LoRa, or cellular networks to transmit data.
Data Processing: Microcontrollers or cloud services process the incoming data.
User Interface: Web/mobile applications to monitor and control devices.
Popular IoT Hardware Platforms
Arduino: An open-source electronics platform based on simple microcontrollers.
Raspberry Pi: A small, affordable computer ideal for more powerful IoT applications.
ESP8266/ESP32: Low-cost Wi-Fi-enabled microchips widely used in IoT projects.
Languages Used in IoT Programming
C/C++: Commonly used for low-level programming on microcontrollers like Arduino.
Python: Popular for Raspberry Pi and edge computing due to its simplicity.
JavaScript (Node.js): Useful for IoT dashboards and server-side applications.
MicroPython: A lightweight version of Python optimized for microcontrollers.
Example: Blinking an LED with Arduino
void setup() { pinMode(13, OUTPUT); // Set digital pin 13 as output } void loop() { digitalWrite(13, HIGH); // Turn the LED on delay(1000); // Wait for 1 second digitalWrite(13, LOW); // Turn the LED off delay(1000); // Wait for 1 second }
IoT Data Handling and Cloud Integration
Once your devices are collecting data, you'll need to store and analyze it. Here are some common platforms:
ThingSpeak: A simple platform for IoT data logging and visualization.
Firebase: Real-time database ideal for mobile IoT applications.
AWS IoT Core: Scalable cloud service for managing IoT devices.
MQTT Protocol: Lightweight messaging protocol used for IoT device communication.
Popular IoT Projects to Try
Smart door lock controlled by a mobile app
Home temperature monitor with alerts
Motion detection security camera
Plant watering system based on soil moisture levels
Fitness tracker using accelerometers
Best Practices for IoT Programming
Use lightweight protocols and efficient code to conserve resources.
Secure your devices with strong authentication and encryption.
Plan for over-the-air (OTA) updates to patch software bugs.
Reduce power consumption for battery-powered devices.
Test in real-world conditions to ensure reliability.
Conclusion
IoT programming opens the door to endless possibilities for innovation and automation. Whether you're just blinking LEDs or building a smart home system, learning IoT programming will give you the skills to bring physical objects to life through code. Start simple, keep exploring, and gradually build smarter and more connected projects.
0 notes
Text
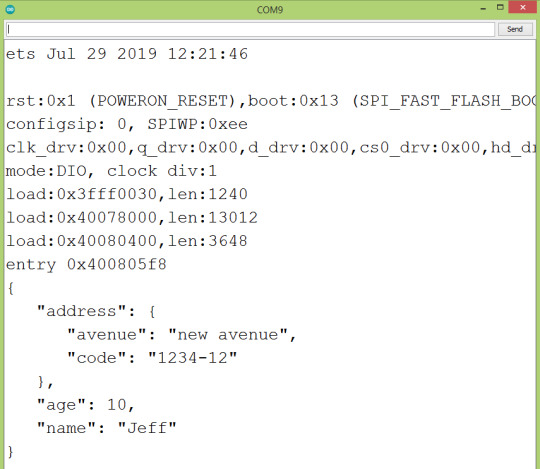
ESP32: JSON Merge Patch
ESP32: JSON Merge Patch
Introduction In this tutorial we are going to check how to use the Nlohmann/json library to apply the JSON merge patch operation to an object. We will be using the ESP32 and the Arduino core. The JSON merge patch operation (RFC here) allows to describe a set of modifications to be applied to a source JSON object [1]. These modifications are described using a syntax that closely mimics the…
View On WordPress
0 notes
Note
Are µC prices fucky rn? I'm looking for arduino micro/nano clones (to do pwm for a noctua desk fan) on amazon and they're no cheaper than an ESP32 WROOM. both are 3 for £20 ish.
STM's Cortex chips (ARM M0/M4/M7 etc.) in particular are super out of stock, and those are the basis of a lot of the nano/micro size parts like the Bluepill or the Pro Micro. A few engineers I know have had to switch entire designs from Cortex to ESP32 just for supply reasons. The stock is recovering in the past few months but it's still not enough to meet demand. ESP is doing better, and Atmel/Microchip seem to be doing okay.
The ESP32's are a really good choice for home projects, several decent toolchains (ESP-RTOS is extremely handy) and if you don't mind limiting yourself to only one core you can program them in Arduino. Built-in WiFi is one of those things you think you don't need but once you have it you use it for everything, it's a great configuration and control interface.
21 notes
·
View notes